

Before you start
You need:- Admin access to your identity provider, to register a new SAML application.
- A running Context7 On-Premise instance, served over HTTPS in production.
- A Context7 admin account. On a fresh install it is
admin/adminuntil you change it.
Only one SSO provider can be active at a time. Enabling SAML turns off Microsoft Entra ID and OIDC, and enabling either of those turns off SAML.
Context7 builds its SAML URLs from the address it is reached at. Behind a reverse proxy, the proxy must send the
X-Forwarded-Proto and X-Forwarded-Host headers with your public scheme and host. Otherwise Context7 advertises internal URLs and sign-in fails.Part 1: Register Context7 in your identity provider
In Context7, sign in as an admin, open Workspace Settings, and go to the Authentication section on the General tab. In the Single Sign-On card, select the SAML 2.0 tab. The Service provider section at the bottom of the tab lists what your IdP needs, with copy buttons.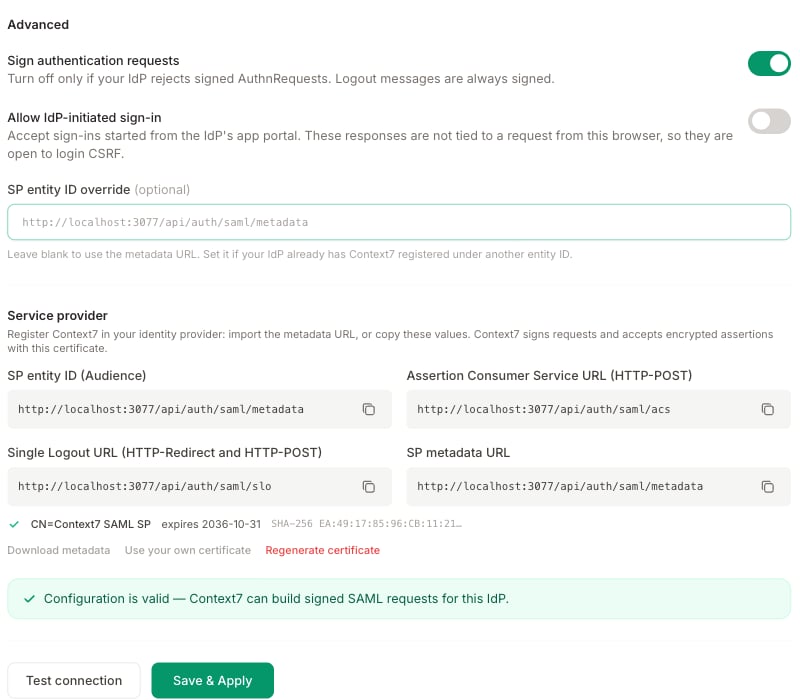
The easiest way is to import the SP metadata URL in your IdP, or upload the file from Download metadata. The metadata also carries Context7’s certificate. It is public, so you can set up your IdP before you turn SAML on.
When you create the application in your IdP:
- NameID: send a persistent identifier, or an email address that never changes. Context7 recognizes returning users by it. If your IdP can only send a transient NameID, set a User ID attribute in Context7 (Part 2).
- Signing: sign the SAML response, the assertion, or both. RSA-SHA256 is recommended.
- Attributes: send the user’s email, name and groups.
- Encryption (optional): your IdP may encrypt assertions with Context7’s certificate from the metadata.
Provider-specific notes
Okta
Okta
Create an app integration with the SAML 2.0 sign-in method. Set Single sign-on URL to the Assertion Consumer Service URL and Audience URI (SP Entity ID) to the SP entity ID. Choose Persistent or EmailAddress as the Name ID format. Add attribute statements for
email, firstName and lastName, and a group attribute statement named groups with a filter for the groups you want to send. Then copy the app’s Metadata URL from the Sign On tab into Context7.Microsoft Entra ID
Microsoft Entra ID
In Enterprise applications, create a non-gallery application and choose SAML as the single sign-on method. Upload the Context7 metadata file, or enter the Identifier (Entity ID), Reply URL and Logout URL by hand. Use Add a group claim to send group membership. Entra sends group object IDs, so use the object IDs as the admin and member group values in Context7. Then copy the App Federation Metadata Url into Context7.If Entra ID is your only IdP, you can use the dedicated Microsoft Entra SSO integration instead.
ADFS
ADFS
Add a relying party trust and import its data from the Context7 metadata URL or file. Add claim rules that send the user’s email, display name and group membership, and a rule that sends a persistent identifier or the email address as the NameID. Then use
https://<your-adfs-host>/FederationMetadata/2007-06/FederationMetadata.xml as the metadata URL in Context7.Keycloak
Keycloak
In your realm, open Clients and import a client from the Context7 metadata file. Set the Name ID format to
persistent. Add a Group list mapper with the attribute name groups and Full group path turned off, and user property mappers for email, firstName and lastName. Then use https://<your-keycloak-host>/realms/<realm>/protocol/saml/descriptor as the metadata URL in Context7.Part 2: Configure Context7
1
Import the IdP metadata
Turn on Enable SAML 2.0. Paste your IdP’s metadata URL into IdP metadata URL and click Import. If your IdP gives you a file instead, click Paste XML instead and paste its contents.Context7 fills in the IdP entity ID, Single sign-on URL and binding, Single logout URL, and IdP signing certificates. Check the values; you can also enter or change them by hand.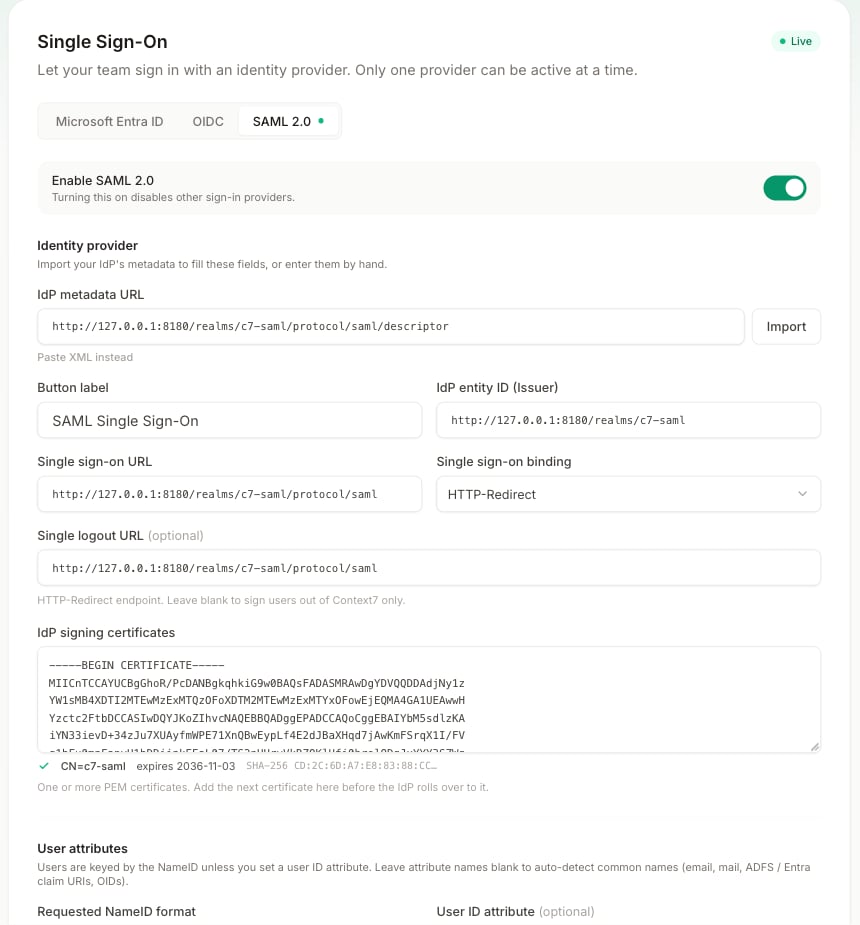
- IdP URLs must use HTTPS. Plain HTTP is accepted only for
localhost. - The metadata must describe one IdP. If yours publishes a federation file with many IdPs, use your own IdP’s metadata URL.
- Single logout URL is optional. Without it, signing out of Context7 does not sign the user out of the IdP.
2
Map user attributes
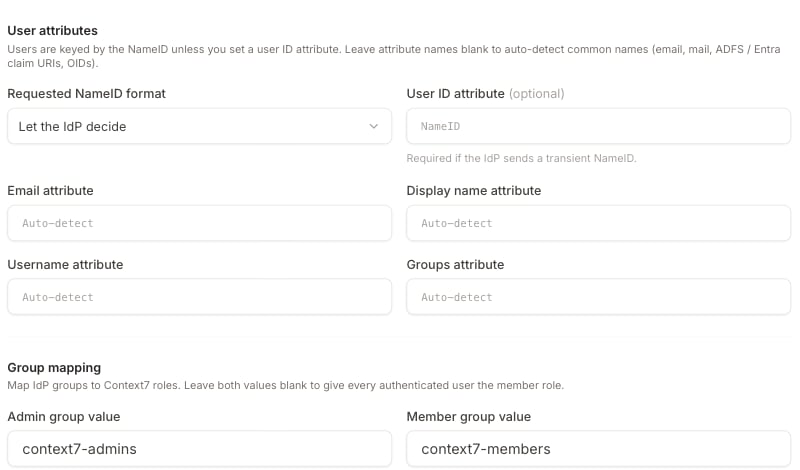
- Requested NameID format: Let the IdP decide works for most IdPs.
- User ID attribute: identify users by an attribute instead of the NameID. Required when the IdP sends a transient NameID.
- Email, Display name, Username and Groups attribute: blank means auto-detect. Context7 recognizes the common names, such as
emailormail,displayNameorgivenNameandsn,groupsormemberOf, and the standard Microsoft (Entra ID and ADFS) claims. Enter a name here only if your IdP uses a different one.
3
Map groups to roles
- Admin group value: the exact group that gets the Context7 admin role.
- Member group value: the exact group that gets the member role.
4
Test and save
Click Test connection to check the settings without saving them. It does not contact your IdP, so sign in once afterwards to confirm the whole flow. It also warns you when an IdP certificate has expired or expires within 30 days.Click Save & Apply. The status in the card header changes to Live.
Advanced settings
- Sign authentication requests (on by default): Context7 signs its sign-in requests. Turn this off only if your IdP rejects signed requests.
- Allow IdP-initiated sign-in (off by default): accept sign-ins that start from your IdP’s app portal instead of the Context7 login page. These sign-ins cannot be tied to a request from the user’s browser, which makes them less secure. Turn this on only if your users need it.
- SP entity ID override: set this only if your IdP already has Context7 registered under a different entity ID.
Part 3: Sign in
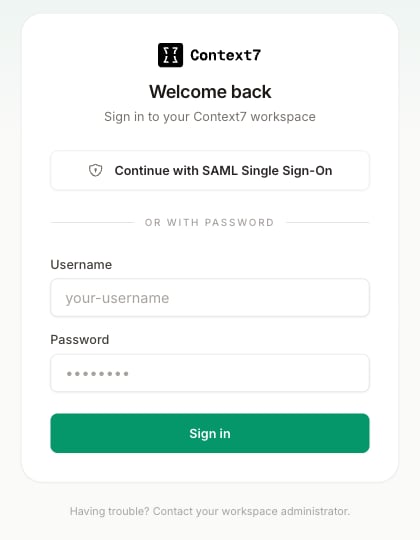
Open/login in a new browser window and click Continue with [your button label].
Signing out
- From Context7: if a Single logout URL is set, Context7 also signs the user out of the IdP and then returns them to the Context7 login page.
- From your IdP: when your IdP sends Context7 a logout request, Context7 ends all of that user’s Context7 sessions. The request must be signed by the IdP; unsigned requests are rejected.
Certificates
Context7’s certificate. Context7 creates its own key pair the first time SAML is used and stores the private key encrypted. It signs Context7’s requests, and your IdP can use it to encrypt assertions. Under the service provider values you can:- Download metadata to give your IdP the current certificate.
- Use your own certificate: upload an RSA private key and its certificate in PEM format.
- Regenerate certificate: create a new key pair.
Security
Context7 accepts a sign-in only when the response:- is signed by one of your IdP’s certificates and was not changed after signing;
- comes from your IdP and is meant for this Context7 instance;
- answers a sign-in started from the same browser, unless IdP-initiated sign-in is allowed;
- is still valid, allowing 60 seconds of clock difference;
- has not been used before.
Disabling password sign-in
Once SAML is live, you can require everyone to sign in through your IdP: turn off the Password sign-in card below the SSO card.Managing users
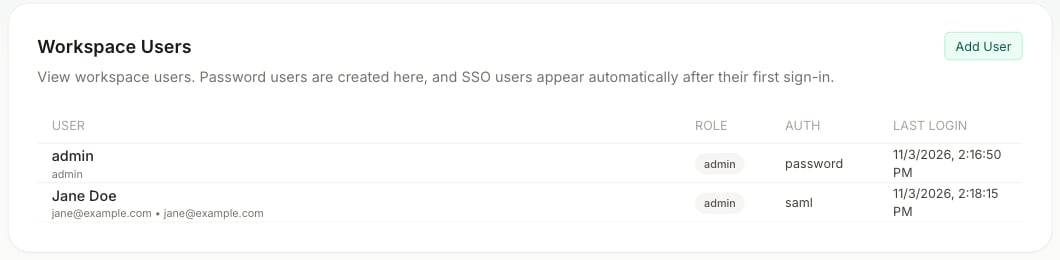
Users who have signed in appear in Workspace Settings → Users, withsaml as their sign-in method.
Troubleshooting
”Sign-in must start from Context7”
The user started from your IdP’s app portal. Sign in from the Context7 login page, or turn on Allow IdP-initiated sign-in.”Single sign-on session expired. Please try again.”
The sign-in took more than 10 minutes, started and ended on different hostnames, or lost its cookie at a proxy. Try again in a new browser window.”The SAML response signature could not be verified”
Context7 does not have your IdP’s current signing certificate, or the IdP did not sign the response. Import the IdP metadata again, and check that your IdP signs the response or the assertion.”Unknown SAML issuer” or “audience mismatch”
The IdP entity ID in Context7, or the SP entity ID in your IdP, does not match. Import the IdP metadata again, and check that your IdP uses the SP entity ID shown in Context7.”SAML response was sent to … not to this service’s ACS URL” or “no valid bearer subject confirmation”
The IdP sends users to a different URL than Context7 expects, usually because of a reverse proxy. Check that the proxy sendsX-Forwarded-Proto and X-Forwarded-Host, and that the Assertion Consumer Service URL in your IdP matches the one in Context7 exactly.
”The SAML assertion has expired or is not yet valid”
The clocks on the Context7 server and the IdP differ by more than 60 seconds. Sync both with NTP.”The identity provider sent a transient NameID”
Set your IdP to send a persistent NameID, or set a User ID attribute in Context7 that never changes for a user, such as an employee ID.”This account is not assigned a supported Context7 group”
None of the user’s groups matches the admin or member group value. Check that your IdP sends groups, and that the group values match exactly, including case. For Entra ID, use the group object IDs.For anything not covered here, contact context7@upstash.com.